....
...
How To Install Windows With Flashdisk How To Install Windows With Flashdisk How To Install Windows With Flashdisk How To Install Windows With Flashdisk

Yes This time I Want Love Tips Agan2 Who Wants to Reinstall Windows But Ga Have CD-ROM .. Or contact with Blue Screen So Will not Boot Into Windows,, I Love The solution .. That Aided flash .. How to Use Media grouch That Make bootable flash Windows Installed But Could surplus Through Ga BIOS..Sehingga We Need To Go To Home Windows ... Methods pembuatanya There are two Cara..Yaitu Using Software And Through CMD..Oke,, We siapin Used Material danger ..
1.Flashdisk (Healthy, Kapssitas Large)
2.Mentahan Windows (ISO)
Discuss how we use the First .. Namely Sofware ..Cekidot. !!
1. First, please download the software HERE.
2. Insert your flash open applications Rufus. Your device will automatically be detected as shown below.


Okay We continue Ke installation
Put stick and restart your PC. Change the necessary settings in the BIOS / UEFI boot order of your order first into a device filled with the installation of Windows 10.


Yes This time I Want Love Tips Agan2 Who Wants to Reinstall Windows But Ga Have CD-ROM .. Or contact with Blue Screen So Will not Boot Into Windows,, I Love The solution .. That Aided flash .. How to Use Media grouch That Make bootable flash Windows Installed But Could surplus Through Ga BIOS..Sehingga We Need To Go To Home Windows ... Methods pembuatanya There are two Cara..Yaitu Using Software And Through CMD..Oke,, We siapin Used Material danger ..
1.Flashdisk (Healthy, Kapssitas Large)
2.Mentahan Windows (ISO)
Discuss how we use the First .. Namely Sofware ..Cekidot. !!
1. First, please download the software HERE.
2. Insert your flash open applications Rufus. Your device will automatically be detected as shown below.
3. Click image CD drive to select the location of the ISO file windowsnya. Then click Open.
4. Automatically Rufus will change the file system from FAT32 to NTFS. You can rename the drive in the New volume label. Then click Start.
5. You will see a notification that all data on the drive will be formatted, so make sure that you are backing up all important data. Then click OK.
6. The process takes approximately 20 minutes. This application is very fast, but it all depends on how big the size of the operating system and the speed of the flash is used.
7. Done! Your flash can now be used for windows installation media. Then click Close.
We get in the way Kedua..Yaitu using the CMD (Run):
First prepare the first USB flash which will be used along with the Windows installer ISO file. After that plug the thumb drive in a PC, and once it is detected open Run (Win + R) -> type diskpart -> Enter
Diskpart CMD window opens, type list disk -> Enter
See how USB flash disk you. You can fix this easily by size (size) of the flash. In this example, USB flash I was Disk 3.
After that, type select disk 3 (replace 3 with the ID of the order of your USB flash disk) -> Enter
Type the clean and press Enter to delete the partition, file system, and the data is still stored on the USB stick. Make sure the cleaning process was successful diskpart.
Then, enter the create partition primary -> Enter. Make sure the partition creation process successfully.
After it made the partition as active by typing active -> Enter. Make sure the partition is successfully set as active.
Format the partition with the FAT32 file system. The trick simply type format fs = fat32 quick label = febian -> Enter (change the name of the label with the name you want)
Once successful, then the flash you've become an active primary partition and bootable. Close window diskpart by typing exit.
Now you live mount the Windows installer ISO file and copy all the contents to the flash.
Now you live mount the Windows installer ISO file and copy all the contents to the flash.
After all the copied contents into the flash, the flash is ready for you to use to install Windows.
Icon rose is not a USB flash storage icon again, but the installer icon like this
And by the way, you've managed to create a bootable USB Windows without using any additional software. Congratulations! :)
Okay We continue Ke installation
Put stick and restart your PC. Change the necessary settings in the BIOS / UEFI boot order of your order first into a device filled with the installation of Windows 10.
Once we get into the BIOS (as see below), we can start to arrange the order of the boot process.
Search Menu BOOT, if no, looking at another menu in which there is information such as: Boot, Boot, Boot Order, Boot Priority and sebagainyaJika USB stick is already installed and the BIOS also supports the introduction of USB, should appear as follows:- For certain BIOS, such as the AMI BIOS, there are only 1st and 2nd Boot Boot, so maybe the USB stick will not immediately appear in the selection / boot sequence.
maka perlu di cek di pilihan lain, masih di menu utama BOOT, disini adalah Hard Disk Drives. Pastikan USB Flashdisk dipindahkan di urutan pertama.
- Next, change in order to stick ranks first in the boot sequence (usually no description Boot Priority Order, Boot Device Priority, and the like)
- When finished, see the Exit menu and select menu Exit Saving Changes or Save Changes and Exit
- The setting will be saved and the computer will restart, then the computer will first read the USB stick


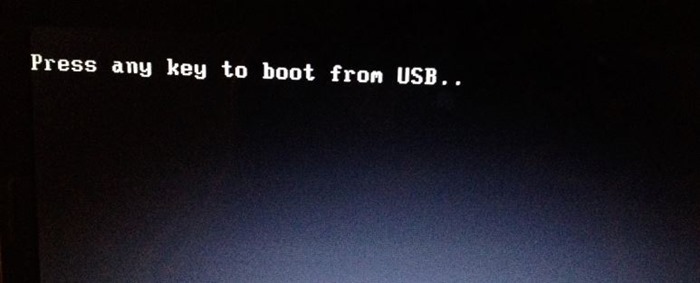
Once your PC back on, it will show the message "Press any key to boot from DVD or USB", press Enter to start the installation.
Press any key to boot from DVD or USB
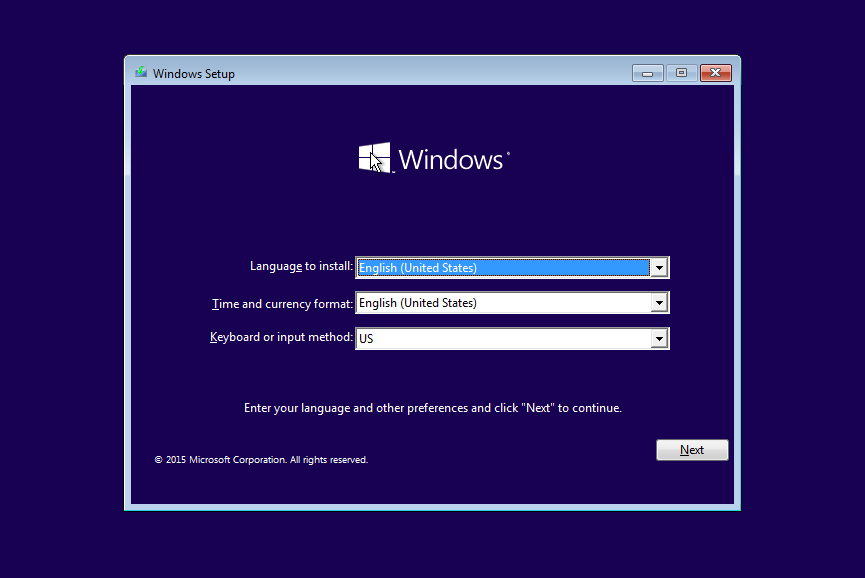
Step 4: Once the image below appears, select the language you want to use (Language to install), Time and Currency (Time and Currency format), and input perangkan input (Keyboard or input method) before clicking the Next button.
Install Windows 10
Step 5: You will see a screen like the picture below - Click the Install button to continue.
Install Windows 10
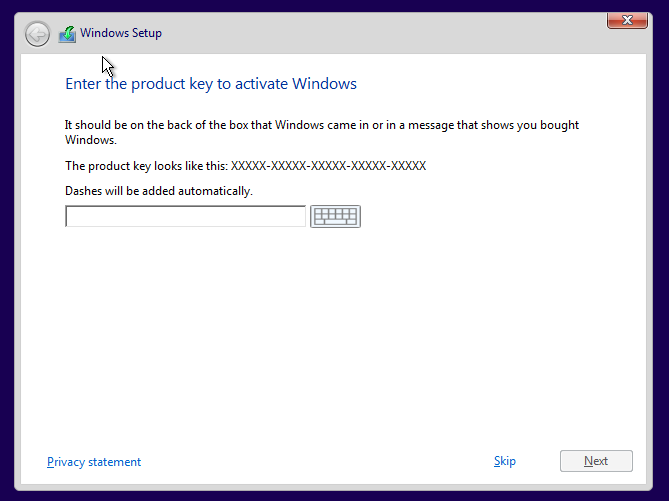
Step 6: Next, you will be prompted to enter a product key (product key). Enter the 25-character product key and click the Next button. If you do not already have a product key, you can pass by clicking the Skip button.
Product Key Windows 10
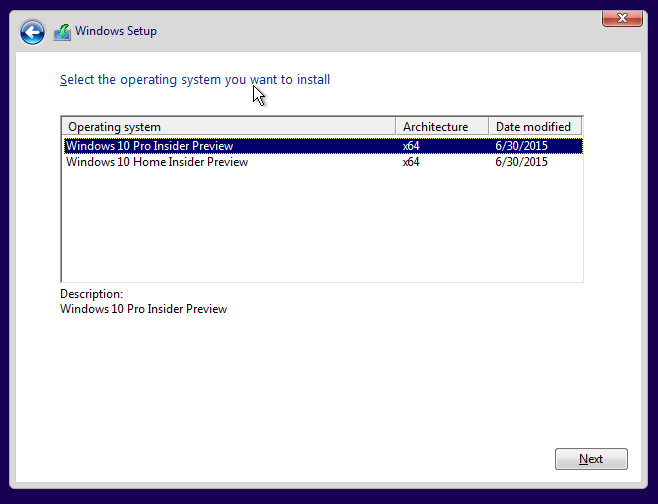
If you enter a product key in Step 6, you will not be prompted to select the version of Windows you want to install (version of Windows is determined by the product key).
Versi Windows 10
Step 7: In the "license agreement", I recommend to read it first (but I'm sure you are lazy to read it), click I accept the license terms and click the Next button.
Persetujuan Penggunaan Windows 10
Step 8: Here you will be given two options:
# Upgrade: Install Windows, but do not delete existing files on the drive
# Custom: Install Windows by deleting all files that previously existed.
# Upgrade: Install Windows, but do not delete existing files on the drive
# Custom: Install Windows by deleting all files that previously existed.
Install Windows 10
Because here we are going to reinstall Windows 10, then click on the second option entitled "Custom: install Windows only (advanced)".
Step 9: Next select which partitions you want to use to install Windows. If you want to use previous partitions already installed Windows, you need to reformat it first before installing Windows 10.
Step 9: Next select which partitions you want to use to install Windows. If you want to use previous partitions already installed Windows, you need to reformat it first before installing Windows 10.
Partisi Install Windows 10
To format a partition, select the partition where you want to format and click Format. Please note that by formatting the partition, you will erase all existing data on that partition.
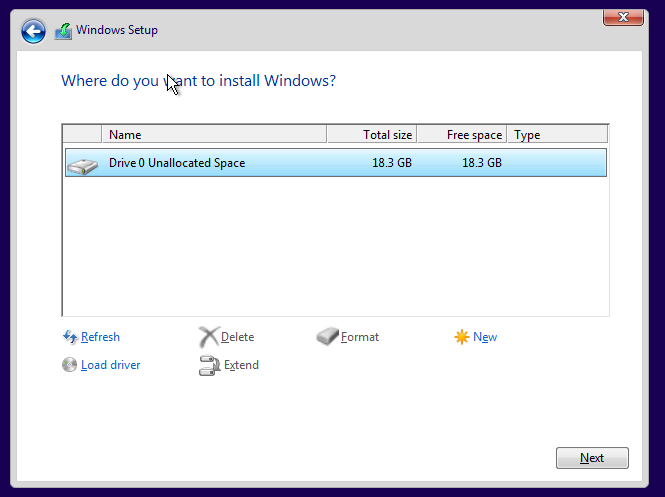
If you install Windows 10 on a new hard disk or SSD and disk has not been partitioned, you will see the list of drives as unallocated space. Select the drive and click the New button, enter at least 20 GB (at the time of testing AplikasiPC, Windows 10 only use 18 GB of disk space), and then click the Apply button.
If you install Windows 10 on a new hard disk or SSD and disk has not been partitioned, you will see the list of drives as unallocated space. Select the drive and click the New button, enter at least 20 GB (at the time of testing AplikasiPC, Windows 10 only use 18 GB of disk space), and then click the Apply button.
Partisi Install Windows 10
If you see a window with the message "To Ensure that all Windows features work Correctly, Windows MIGHT create additional partitions for system files," click the OK button. Usually Windows 10 will create a new partition with a size of 100 MB for copying file systems. Done